
Hello one and all...
Welcome back to my blog.
Today I am going to share a little tutorial on how to make some mini A6 Notebooks (15 pages 30 sides) using just a variety of basic office equipment in approximately 8-10 minutes (per notebook).
Disclaimer: This is how I create my notebooks, that I sell via etsy. This is not the only way, nor necessarily the easiest/best way, but it is how I have learned and the results are top knotch. I recommend you practice this technique and then adjust to suit your requirements/needs.
Happy Making!!!!
Open up your design (if using a digital design), ensuring the template is A4 in size, adjust the scale of the design, baring in mind this will become an A6 notebook and large scale prints may not work as well as if it were smaller in scale.

Send to printer, I use the specifications below:
(sheetfeeder, borderless, Epson Photo Quality) and placed my logo across the back of the design ensuring it doesn't affect the pattern.
(this is optional, but recommended if you intend to sell them)

EQUIPMENT
7 sheets A4 white paper
(I use basic printing paper)
1 A4 sheet with chosen design
(I use Linen cardstock at 300gsm)
Paper trimmer
Metal ruler
Sharp Scalpel/blade
Long arm Stapler
Staples

Using the paper trimmer, cut the A4 white paper in half, width way, repeat with patterned paper.

Fold the patterned paper in half, to create a guideline for the staples, I use the black slider to make sure the staples are inserted evenly at either side of the line. Two staples should be all that is needed.

Turn the notebook over and using the metal ruler against the staples on the left hand side, pull the paper from the right hand side and create a crease rubbing your thumb across the outer side.
Turn the paper around 180 degrees and repeat. This will create a fold that allows the paper to turn easily.

As you can see the notebook now folds over and has a nice curve to the seam where the staples sit evenly.

Here you have 2 options.
(I prefer the scalpel, but find the paper trimmer works well).
As you have folded the paper over, you will find that there are overlapping sheets, and odd sheets of paper longer than others. Using either method, trim the paper down so the paper and the front cover are the same size. You should only need to remove minimal slices (see trimmer photo).
Please note: if you use a hand scalpel or as I have a blade, please ensure the blade is super sharp, as a blunt blade will just drag the paper and ruin the whole notebook. A sharp blade should only need one or two strokes to trim the paper.


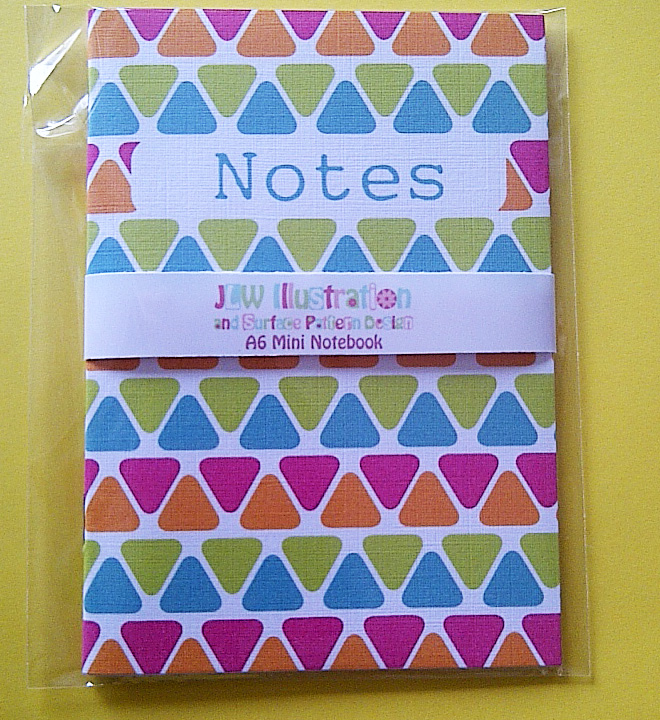
Here you can see the finished product, complete with a band of card (semigloss epson paper) with my business logo on and a small product description.

P.S I noticed the pattern across the top was a little uneven after I took this picture. This is common, simply trim it to even size. Please note all sizes are approximate as this is handmade.
Back of notebook, simply use a small piece of tape, or double sided to fix the band together.

I always seal my notebooks in a C6 (A6) clear sealable bag available from any craft store/online store/eBay. This not only keeps it clean while being stored but looks professional when posting out to customers.
Here we have both notebooks complete, using 1 sheet of A4 Cardstock, 7 sheets of A4 paper, a few office essentials and a little patience.
Including time, it costs approx 60p to make 2, probably less with practice.

Don't be disheartened if it doesn't work first time, I must have made 5-10 of them before I created one I felt was suitable to sell.
Remember, if you find an easier solution to any section, give it a try, maybe there are other ways to make a mini notebook, and I'm 100% sure that there are, but this is my way, and it may just be your way too.
Note: Easily applicable to creating and A5 notebook also.
Thanks for reading...